Automations with SmartThings and Custom Sound Files
Ecolink Z-Wave Siren + Chime

Overview
The Ecolink Siren+Chime is a new generation smart Siren created by Ecolink. With 30 pre-loaded sound files and support for additional custom sounds using an SD card, users can integrate this to their SmartThings hub to customize their systems with various chime, doorbell, and emergency sounds. This manual will show how to install the device handler in SmartThings and getting setup for automations for your smart siren.
Requirements for Automation?
Device handler installed into your SmartThings account.
Device paired with Smart Things.
Setup Home Automations on the SmartThings App
1. On the SmartThings app, tap the hamburger icon on the top left (three horizontal lines) and click on Automation.
2. Press the add icon “+” on the top right.
3. You can setup any desired conditions for your automations, such as getting your siren to play a sound when another compatible SmartThings device (eg. door/window sensor) triggers.

4. In this example, the Ecolink Chime + Siren is set to play sound number “24” at 100% sound volume when an Ecolink Door/Window Sensor opens.

5. When you have the automation setup you want, tap Done.
6. Congratulations, you have successfully setup your first automation with the Ecolink Siren + Chime. To add more automations using your smart siren, press the “+” icon on the top right and repeat the same process.

Custom Sounds Overview
The Ecolink Chime + Siren is enabled to play your custom .wav sound files. Simply place compatible .wave files onto a microSD card and you will be able to place.
The sound files must be in the following formats:
-
-
- Mono
- 16 kHz sampling rate
- 16-bit
- .WAV file format
-
How to convert your sound files into compatible .wav files
Download free audio software editor, Audacity. Version 2.3.3 has been confirmed to work. We will show the example with this software.
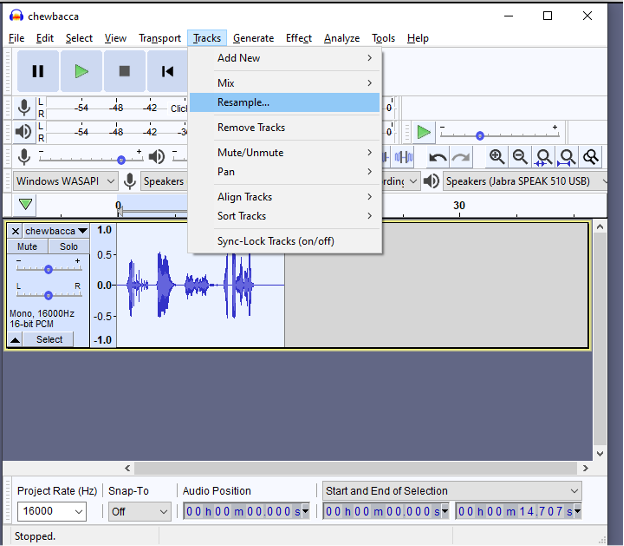
1. Load the sound file onto Audacity. In the example, we are using Chewbacca.mp3.

2. Change the project rate to 16000 Hz.
3. Click on the file name drop down and go to Format > and change to 16-bit PCM.

4. Click”Select” on the file and go to the Menu Bar “Tracks” > “Resample” and change to 16000 Hz and press OK.

5. Click on the menu bar for “File” > “Export” > “Export as WAV”.


6. Name your file:
-
-
- Note how you name your file will determine the order of how it will load up onto the Chime + Siren. For example, if you put a numeric digit in front of the file name, it will become that sound number.
- The Chime + Siren comes with 30 included sounds. Numbers 1-30 are already pre-populated. If you would like to replace some of those sounds, put the sound number you would like to replace as the beginning of the file name.
- If you want to replace Chime Sound “4. Chime 4 (Tinker)”, name your .wav file beginning with “4”.
- If you’d like to keep all original 30 sounds, you can name your sounds 31-125. Example: 46. SoundNameHere
- Custom sound files that do not have a number in the front of the file name will be sorted alphabetically and will start at sound number 31.
-
How to setup your custom sound file on SmartThings
For each automation, you will only be able to set one sound to play. Please only use one of the following combinations.
1. Set Sound Volume & Play Sound
2. Set Chime Sound & Set Chime Volume
3. Set Chime
4. Set Siren Sound & Set Siren Volume
5. Alarm Type
This means you cannot set “Play Sound 24” and “Set Chime Sound – One beep” within the same automation.

The Play Sound group can play any sound from 1-125.
The Chime Sound group can play sound numbers 1-12 and 18-30.
The Siren Sound group can play sound numbers 13-17 and 25 and 26.
